
Hello Everyone, Welcome to the Part 2
of Linux 32-bit Binary Exploitation, if you have not gone through my previous
article, it would recommend you to go through the part I of this series - Assembly Basics, where I covered all the important
parts to start with Assembly and binary exploitation, it’s only an overview/brief
explanation of assembly but I think that’s enough to start with.
In this Tutorial, I will walk you
through a Vulnerable ELF file, which is vulnerable to buffer overflow – return to
libc exploit. So, I will explain return
to libc exploit in detail practically using GDB & GDB-peda. Before going
into the process, lets make sure you get to know the about buffer overflow.
THIS IS MERELY CREATED FOR EDUCATIONAL & ETHICAL PURPOSE ONLY, AUTHOR IS NOT RESPONSIBLE FOR ANY ILLEGAL ACTIVITIES DONE BY THE VISITORS
THIS IS MERELY CREATED FOR EDUCATIONAL & ETHICAL PURPOSE ONLY, AUTHOR IS NOT RESPONSIBLE FOR ANY ILLEGAL ACTIVITIES DONE BY THE VISITORS
What you need to know Before checking
this out:
·
AssemblyBasics – At least about registers.
·
C
programming – functions, pointers
·
Stack
Concept
·
Strong
Linux Knowledge is preferred
What I am about to explain in this
article is pretty much straight forward and easy, I choose this binary because
its pretty easy to explain and there is no complex exploit development involved
in this. So, what we are going to do is smash the stack and push our shell code
into EIP – Instruction pointer register and call it using c library functions.
What is Buffer Overflow:
When the data written to the buffer is
larger than the size of the buffer and due to insufficient bounds checking, it
overflows and overwrites adjacent memory locations.
For example, I have a memory of 40 bytes,
and if I try to push 50 bytes of data into it, it overflows with extra data and
the extra data of 10 bytes is pushed into its adjacent register. This is what we
are going to see in practical.
Buffer Overflow Protection Mechanisms:
Before Digging Deeper, you need to know
about memory security mechanisms.
Canary: Canaries or canary words are known
values that are placed between a buffer and control data on the stack to
monitor buffer overflows. When the buffer overflows, the first data to be
corrupted will usually be the canary, and a failed verification of the canary
data will therefore alert of an overflow, which can then be handled. – from Wiki
In Layman terms, Canary puts some
random value in the register before the “user” inputs something and checks it
after “user” enters the input. if the value changes stack has been smashed – which
states that there has been a Buffer overflow attack, and this can be blocked
now.
Fortify: Replaces a bunch of vulnerable calls
with their safe equivalent to help prevent Buffer overflows
PIE: Position independent Executable -- ASLR (all the memory
locations in this binary should stay the same), but it doesn’t mean memory
location in his memory should stay the same.
NIX : The NX Bit (no-execute) is used to segregate areas of
memory for use of processing instructions and storing data. NX bit may mark
certain areas of memory as non-executable. The processor will then refuse to
execute any code residing in these areas of memory. Executable space protection
is a technique used to prevent certain types of malicious software from taking
over computers by inserting their code into another program's data storage area
and running their own code from within this section, this is nothing but buffer
overflow.
RELRO: RELRO is a mitigation technique used
to harden the sections of an ELF binary/application/process. There are two
modes in RELRO, partial and full. In Partial
RELRO data sections (.data and .bss) are reordered so that they can come after
the ELF internal data sections, exploitation is still possible in partial RELRO
because GOT is still writable here. In Full RELRO it can mitigate
the process of modifying the GOT(Global Offset Table) entry to get control of
the program. This is done by making the entire GOT as read-only.
What is ret2libc:
Libc is a binary in “C language” which
can work with kernel and can execute anything and libc is vulnerable to a very
famous ret2libc attack. As the name says return to c library.
Normally to perform buffer overflow, we
write shellcode to a buffer, and overwriting the return address in the stack –
where our shellcode is present, to execute the shellcode. This was prevented by
using DEP – Data execution Prevention inside the stack. So, a new attack came
into picture which is ret2libc. In ret2libc – as we cannot execute our shell
code in the buffer because of DEP, what we can do is use already inbuilt
functions of c library such as system() ,
exit(), /bin/sh.
Because of ret2libc – things became pretty
much straight forward – all we need to do is push our shellcode into EIP and
jump to our system() function address, which can execute our shellcode giving us
our desired output – in most of the cases – a shell. Basically, we need to have
control over the return address, then we can point it to "our executable
payload".
Steps to perform ret2libc exploit:
1) Check the File Format of the binary
2) Check if ASLR is Enabled on target machine
3) Check if Binary is vulnerable to Buffer
overflow
4) Check the possible vulnerable libraries
in the binary using Debugger
5) Try to Exploit it 😊
Let’s start our Linux 32-bit Binary
Exploitation – ret2libc
We need 3 important things to create our payload and exploit our binary
1) Buffer length & Control over EIP –
Instruction Pointer
2) System() address
3) Exit () address
Requirements for Linux 32-bit Binary Exploitation
GDB Debugger & Peda
Exploit Development Phase:
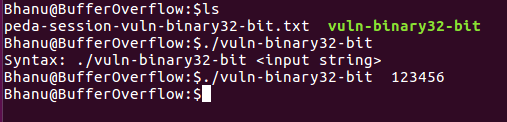
1) Read the file information using file
command in terminal, we can see that the file is a 32-bit ELF.

2) Let’s try running the file and it’s
asking for some input – which can be anything and the output is nothing.
3) As we can pass anything as input,
let’s see how much input this binary can withstand. I will try passing 150
chars and see if it can bare it or not. This is completely trial and error –
sometimes we might have to pass 3000 chars as well. We hit the jackpot at 150,
we got Segmentation faults – this is what we are looking for. By this we can
confirm that this binary is vulnerable to buffer overflow.

4) So, we have a binary with buffer
overflow, lets see if our target system has ASLR turned ON/OFF.
You can check it by cat
/proc/sys/kernel/randomize_va_space;
If the output is 2 – ASLR is ON
If the output is 2 – ASLR is ON
If the output is 0 – ASLR
is OFF
As we are doing this
practical, I prefer ASLR to be turned on – as its fun to exploit with more
security

5) So, lets run the vulnerable binary in
debugger. I personally prefer gdb-peda. You can use either gdb or gdb-peda, note
that if you are using GDB - commands may
vary. When you add ~/peda/peda.py to gdbinit file gdb-peda will run – giving you
a better look and more features. You can launch gdb debugger by

6) Next Main important thing to do is to
check the Buffer overflow protection mechanisms status. The less protections
enabled, the much better it is to perform a buffer overflow. You can check it
by checksec command in gdb-peda. You need to check for ASLR as well. If ASLR is
enabled our exploit gonna be very hard, because it randomizes the addresses and
each time the program is loaded a new address is allocated and we lose track of
the addresses – which is a worst situation. So, to check ASLR status type “aslr”
in gdb-peda. In this case ASLR is turned
off, which makes our exploit very easy.

7) Let’s try running the program to see
what’s going on in the program. When we run the program, we see some “C
language” functions – which states that we can try ret2lib which is C lang based.

8) Lets try to pass some input. As expected
we see segmentation fault.

9) The most important register when
exploiting buffer overflow is EIP & ESP. EIP holds the instructions to be
executed and what comes before EIP is ESP which is the end of stack. Only after
ESP is full, the data flows into EIP. The A’s that we passed are inside the ESP
as well, which means we have control over EIP register. Now, we need to pass
something meaning full like a shell code which can give us a shell access.

10) As
we passed all A’s in the prev command, we are unable to pinpoint the exact
location of the ESP. Now let’s pass some random input which can be created in
gdb-peda. As we already know segmentation error occurs before 150, lets’ try the
same value.

11) Pass
the junk data created using pattern_create as input and we can see a unique value
in EIP. Now, all that’s left is to find out the maximum size this binary can
take as input. Here we got the EIP address 0x41384141, which we need 😊


12) We
can use EIP offset address to get exact value where the buffer overflow occurs.
By running the pattern_offset command we found out the binary break point
is after 112 characters.

13) To
see the exact offset locations, we can use pattern_search


14) As
we got the location where the buffer overflow occurs, we need to craft out
payload. To get a shell we can use “C library’s” system() function, exit()
syscall and /bin/sh from libc. This can be done by passing “/bin/sh” into system()
function which executes the any input given into it and exit() for establishing
proper communication. To find the address of exit and system, just search for
print system and print exit.

15) Finding
“/bin/sh” address. In gdb-peda searching for anything is very easy. Just typing
find “/bin/sh” and we can get the /bin/sh address. Lets verify the address
found is “/bin/sh” or not using x/s.

16) Now is the
time to craft our payload and start the exploitation. We got all the required info.
Lets take a look at the information we gathered.
17) We need to convert these values into
little endian, as the 32-bit binary reads the input as Little endian. To convert
to little endian – we need to reverse the characters. We can do this either manually
or using python struct package. As there are only 3 values, I prefer to do it
manually. The addresses after converting to little Endian looks like below
18) ASLR randomizes the offset location of
the memory. So, we need to brute force all the possible addresses and find the
exact one. we need to make an exploit with all 4 values we got.
We
need to make an exploit with all 4 values we got. The order to make the exploit
is offset A*112 + System + Exit + /bin/sh.
And the Final payload looks like this.

19) It might take a minute or two to brutefore all the values and get us a shell. In order to get a root shell the binary should be running as root.

Well, Thats how you do a Buffer overflow return
to libc exploitation. This is one of the easiest and best one to start learning
buffer over flow concepts. you need not learn everything at once. Go step by
step, start with the simple stuff and keep practicing until it gets struck in
your memory. Have a great day. If you have any doubts/queries let me know in
comments.
================== HACKING DREAM ===================
Main Principle of My Hacking Dream is to Promote Hacking Tricks and Tips to All the People in the World, So That Everyone will be Aware of Hacking and protect themselves from Getting Hacked. Hacking Don’t Need Agreements.
I Will Be Very Happy To Help You, So For Queries or Any Problem Comment Below or You Can Mail Me At Bhanu@HackingDream.net


No comments:
Post a Comment